 English
 中文简体
中文简体 عربى
عربى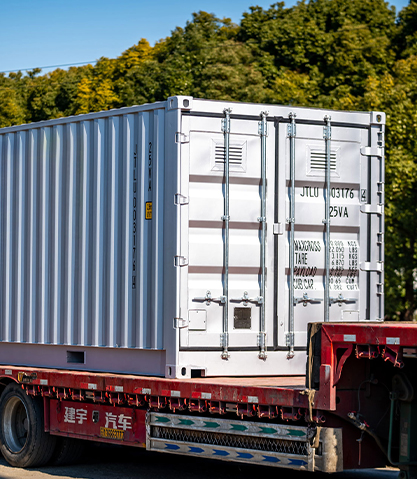
Installing solar panels on a shipping container is entirely practical and increasingly common — whether the container is a static container home, a remote off-grid site, a mobile field base, or a factory-assembled containerised solar system shipped to a deployment location. A standard 20-foot container roof offers approximately 13–14 m² of usable surface area, enough for 6–8 panels generating 2.4–3.2 kW peak — sufficient for a full-time residence with efficient appliances. A 40-foot container doubles that capacity to 4.8–6.4 kW. This article covers mounting options, system sizing, shipping considerations, container home power design, and purpose-built containerised solar units used in off-grid and industrial deployments.
Content
- 1 How Much Solar Power a Shipping Container Roof Can Generate
- 2 Mounting Solar Panels on a Shipping Container: Methods and Considerations
- 3 Container Home Solar Power: Sizing a Complete Off-Grid System
- 4 Containerised Solar Systems: Factory-Assembled Units for Deployment
- 5 Solar Panel Shipping: What to Know Before You Ship Panels
- 6 Structural and Thermal Considerations for Solar on Container Homes
- 7 Cost Estimates: Solar Panels on a Shipping Container
- 8 Practical Design Checklist for Container Solar Projects
How Much Solar Power a Shipping Container Roof Can Generate
Understanding the physical constraints of a container roof is the starting point for any solar design. Standard ISO shipping containers come in two dominant sizes, each offering a defined roof area and corresponding solar capacity.
| Container Size | Roof Dimensions | Usable Area | Panels (400W each) | Peak System Output | Est. Daily Output (5 sun hrs) |
|---|---|---|---|---|---|
| 20-foot standard | 6.06 m × 2.44 m | ~13.5 m² | 6–8 panels | 2.4–3.2 kW | 12–16 kWh |
| 40-foot standard | 12.19 m × 2.44 m | ~27 m² | 12–16 panels | 4.8–6.4 kW | 24–32 kWh |
| 40-foot high cube | 12.19 m × 2.44 m | ~27 m² | 12–16 panels | 4.8–6.4 kW | 24–32 kWh |
Daily output figures assume 5 peak sun hours — the average for mid-latitude locations such as Central Europe, the southern United States, or coastal Australia. Locations closer to the equator (equatorial Africa, Southeast Asia, the Middle East) receive 6–7 peak sun hours daily, increasing output proportionally. A 40-foot container with 16 × 400W panels in a 6 sun-hour location generates approximately 38 kWh/day — more than enough for a family of four in an energy-efficient home.
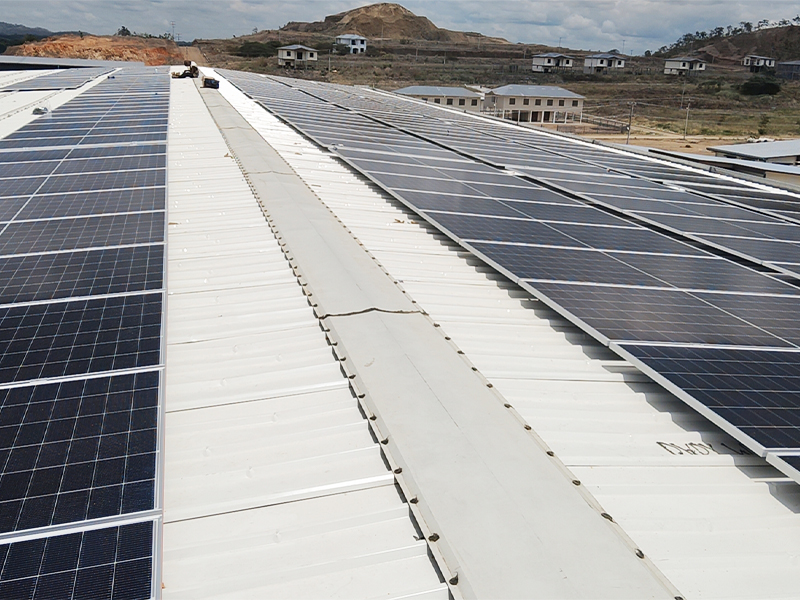
The roof's 2.44 m width is the limiting dimension. Standard residential solar panels are approximately 1.0–1.1 m wide and 1.7–2.1 m long. Laid landscape (long edge parallel to the container length), two panels side-by-side fit the width comfortably. Laid portrait, only one panel fits across the width. Landscape orientation maximizes panel count on container roofs.
Mounting Solar Panels on a Shipping Container: Methods and Considerations
The corrugated steel roof of a standard shipping container presents both advantages and challenges for solar mounting. The steel is structurally robust — designed to support fully loaded stacked containers — but the corrugations require specific mounting hardware, and flat-roof mounting keeps panels horizontal rather than at the optimal tilt angle.
Flat Roof Direct Mount (Simplest)
The simplest approach is mounting panels flat (or at very low tilt, 5–10°) directly to the container roof using corrugation-specific clamps or L-feet bolted through the roof. This keeps the installation low-profile — important for containers being stacked, transported, or used where wind loading is a concern. The trade-off is reduced energy yield: a panel mounted flat instead of at its optimal tilt (typically 30–35° for mid-latitude locations) produces approximately 10–20% less annual energy than the same panel tilted optimally.
For container homes in permanent locations, flat mounting is often the practical choice to maintain the clean architectural profile. For containerised solar systems deployed at fixed sites, a tilt frame offers better returns.
Tilt Frame Mount (Better Yield)
A tilt frame raises one edge of each panel to create an angle toward the sun. Aluminum tilt mounts bolted to the container's top rails (the structural I-beams running the length of the container) provide a strong, non-penetrating anchor that avoids roof leaks. At 30° tilt in a 5 sun-hour location, a 3.2 kW array on a 20-foot container produces approximately 14–16 kWh/day versus 11–13 kWh/day from a flat-mounted equivalent.
The limitation of tilt mounting on a container is wind resistance. A tilted array on an elevated container roof acts as a sail in high winds. For permanent installations, the tilt frame must be engineered to withstand local wind design loads — typically calculated per AS/NZS 1170.2, EN 1991-1-4, or ASCE 7 depending on jurisdiction. In cyclone or hurricane risk zones, flat-mounted panels with low clearance are strongly preferable.
Roof Penetration vs. Non-Penetrating Mounts
Penetrating the container roof with bolts risks creating entry points for water if not correctly sealed. Every penetration must be sealed with appropriate sealant (typically butyl tape plus silicone over-seal) and inspected annually. Non-penetrating ballasted mounts — which use the weight of concrete or steel ballast blocks to hold the racking in place — avoid the leak risk entirely but add significant weight. Each ballasted mount block can weigh 20–50 kg, so a 16-panel ballasted system might add 500–1,000 kg to the container roof. Verify the container's roof load rating before specifying ballasted mounting.
Standard ISO containers are rated for a roof live load of approximately 300 kg/m² when loaded internally but only around 75–150 kg uniformly distributed for roof-only loading. For heavy solar installations, anchor to the top side rails — the primary structural members — rather than the roof panels themselves.
Ground-Mount Supplementary Arrays
For container homes or sites with sufficient land, supplementing the container roof array with a ground-mounted array to the south (or north in the southern hemisphere) removes the panel count limitation imposed by the container roof width. Ground mounts can be sized independently of the container and positioned at optimal tilt and orientation, while the container provides the structural housing for batteries, inverter, and electrical switchgear.
Container Home Solar Power: Sizing a Complete Off-Grid System
A container home solar power system needs to cover daily energy consumption reliably, including during periods of low sun. Sizing involves four interconnected components: the solar array, battery bank, inverter, and charge controller.
Step 1: Establish Daily Load
List every electrical load in the container home, its wattage, and hours of use per day. A typical efficient container home might include:
- LED lighting: 8 fixtures × 10W × 5 hrs = 0.4 kWh/day
- Mini-split air conditioner (1.2 kW): 6 hrs = 7.2 kWh/day
- Refrigerator (90W average): 24 hrs = 2.2 kWh/day
- Laptop, phone charging, TV: 1.0 kWh/day
- Water pump: 0.3 kWh/day
- Total: approximately 11–12 kWh/day
This load profile is comfortably met by a 20-foot container with 8 × 400W panels in a 5 sun-hour location. For higher consumption (electric water heating, induction cooking, larger AC) or for locations with fewer sun hours, a 40-foot container or supplementary ground array becomes necessary.
Step 2: Size the Battery Bank
Off-grid container homes need sufficient battery capacity to carry overnight load and bridge cloudy days. The standard design approach is 2–3 days of autonomy at 50% depth of discharge (DoD) for lead-acid batteries, or 80–90% DoD for lithium iron phosphate (LiFePO4) batteries.
For a 12 kWh/day load with 2 days autonomy and LiFePO4 at 85% DoD: required battery capacity = (12 × 2) ÷ 0.85 = approximately 28 kWh. This could be met by a 30 kWh LiFePO4 battery bank — for example, three 100Ah 48V modules (each 4.8 kWh) for a total of approximately 28.8 kWh usable capacity. LiFePO4 batteries are strongly preferred for container installations due to their superior cycle life (3,000–6,000 cycles vs. 500–1,200 for lead-acid), tolerance for higher temperatures, and substantially smaller physical footprint.
Step 3: Select the Inverter and Charge Controller
For container homes, a hybrid inverter-charger that combines MPPT solar charge control, battery management, and grid or generator backup in a single unit is the most space-efficient solution. Leading options include the Victron MultiPlus-II, Growatt SPF series, and SMA Sunny Island. Size the inverter to handle peak simultaneous loads — if the air conditioner (1.2 kW), refrigerator start surge (600W), and water pump (300W) all run simultaneously, a 3 kW continuous / 6 kW surge inverter provides comfortable headroom.
MPPT charge controllers should be sized for the full array current. For 8 × 400W panels in a 2-string configuration at 48V system voltage, a 60–80A MPPT controller is appropriate. Many hybrid inverters include integrated MPPT controllers rated at 80–120A, eliminating the need for a separate component.
Grid-Tied vs. Off-Grid Container Home Systems
Container homes located where grid connection is available can be configured as grid-tied with battery backup rather than full off-grid. This approach eliminates the need for generator backup on extended cloudy periods, reduces battery bank sizing requirements, and allows export of excess solar generation. Grid-tied container home systems typically require 25–50% smaller battery banks than equivalent off-grid designs, reducing upfront system cost meaningfully.
Containerised Solar Systems: Factory-Assembled Units for Deployment
Beyond individual container homes, a distinct product category exists: the containerised solar power system (also called a solar container, solar power container, or container power plant). These are complete solar energy systems — panels, batteries, inverters, switchgear, monitoring, and load distribution — factory-assembled and pre-tested inside a modified shipping container, then shipped as a single deployable unit.
What a Containerised Solar System Contains
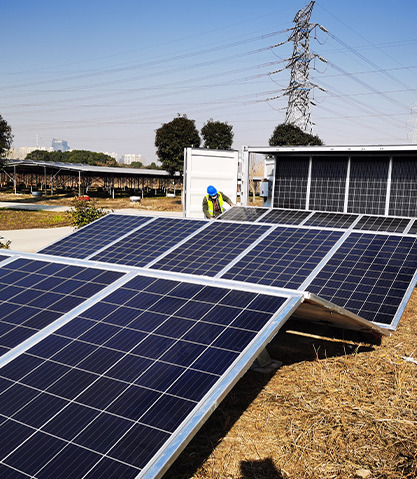
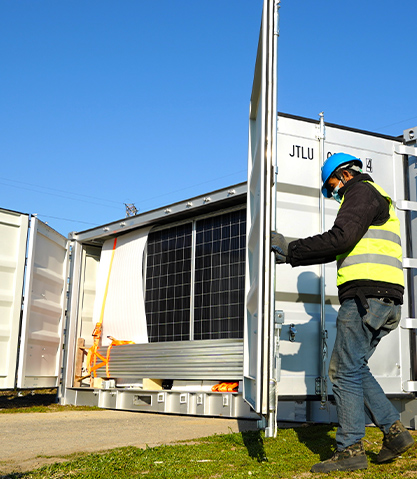
- Solar panels: Stored flat on roof or folded inside for transport; deploy on the roof or on integrated fold-out ground-mount frames once on site
- Battery bank: LiFePO4 cells mounted on internal racks; typical capacity range 50–500 kWh depending on container size and application
- Inverter/charger system: Three-phase or single-phase output; 10–100 kW capacity depending on system scale
- MPPT charge controllers: Sized for the total panel array
- Distribution board and protection: MCBs, RCDs, surge protection, and load circuits pre-wired
- Monitoring system: Remote SCADA or IoT monitoring of generation, storage state, and load consumption
- Thermal management: HVAC or ventilation to maintain battery and electronics within operating temperature range
- Generator connection point: Automatic transfer switch for diesel generator backup during extended low-sun periods
Primary Applications for Containerised Solar Units
The deployability of containerised solar systems makes them suited to applications where fixed infrastructure is impractical or unavailable:
- Remote telecom towers: Solar + battery containers replace diesel generators at off-grid cell towers, cutting fuel costs by 60–90% while reducing maintenance callouts
- Mining and resource extraction sites: Temporary or semi-permanent sites deploy containerised solar to power camps, instrumentation, and communications
- Disaster relief and humanitarian operations: Containerised solar units can be airlifted or shipped to disaster zones and operational within hours of arrival — providing immediate power for medical facilities, water pumping, and communications
- Military forward operating bases: Reduce logistical dependency on diesel fuel, which is one of the highest-cost and highest-risk supply chain elements in remote military deployments
- Agricultural and irrigation power: Deployed seasonally to power irrigation pumps in locations without grid access
- Events and construction sites: Temporary power supply without generator noise, emissions, or fuel handling
- Island and rural electrification: Governments and NGOs deploy containerised solar as rapid electrification solutions for remote communities ahead of permanent grid infrastructure
Typical Containerised Solar System Specifications
| System Scale | Container Size | Solar Array | Battery Capacity | Inverter Output | Typical Use |
|---|---|---|---|---|---|
| Residential / Small Commercial | 20-foot | 5–10 kW | 20–50 kWh | 5–10 kW | Container home, small clinic, telecom |
| Medium Commercial / Community | 40-foot | 20–50 kW | 100–200 kWh | 20–50 kW | Village microgrid, mining camp, event |
| Large Industrial / Grid Support | 40-foot × multiple | 100–500 kW | 500–2,000 kWh | 100–500 kW (3-phase) | Island grid, industrial site, grid BESS |
Solar Panel Shipping: What to Know Before You Ship Panels
Solar panel shipping — whether for individual container home builds or large containerised solar project procurement — involves specific logistics considerations that differ from standard freight. Panels are large, fragile, and have handling requirements that affect both shipping mode and cost.
Panel Packaging and Handling Standards
Standard solar panels are shipped from manufacturers in wooden crates or cartons, typically 20–30 panels per pallet. Each pallet weighs approximately 500–700 kg depending on panel size and count. They are classified as fragile cargo requiring vertical stacking only — panels must not be stacked horizontally or have weight placed on top of the glass surface. IEC 61215 and IEC 61730 certified panels must arrive undamaged to maintain warranty validity; physical damage voids manufacturer warranties regardless of cause.
Sea Freight (FCL and LCL)
Ocean freight in a full container load (FCL) is the standard method for larger shipments. A 20-foot container holds approximately 600–800 solar panels (350–450W each) depending on panel dimensions and packing configuration, representing a 200–360 kW project supply. LCL (less-than-container-load) groupage is used for smaller orders but adds handling charges and transit time. Transit times vary significantly by route: China to Europe averages 28–35 days; China to East Africa 20–28 days; China to the US West Coast 12–18 days.
Air Freight for Solar Panels
Air freight is used only in time-critical situations given the high cost and size/weight limitations of panels. Shipping a single 400W panel by air typically costs $80–$200 per panel versus $3–$8 per panel by sea freight on comparable routes — a 20–50× cost premium. For project developers managing grid-critical deployment deadlines or spare-part requirements, air freight may be justified; for standard procurement, it is not.
Battery Shipping Regulations
Containerised solar systems that include lithium batteries face additional shipping regulations. Lithium-ion and LiFePO4 batteries are classified as Class 9 dangerous goods under IMDG (sea) and IATA (air) regulations. Key requirements include:
- UN38.3 test certification for each battery model — confirms the battery has passed safety testing for transport
- State of charge (SOC) must be ≤ 30% for many battery chemistries during sea or air transport
- Dangerous goods declaration (DGD) and material safety data sheets (MSDS) required with all shipments
- Some carriers and routes restrict or prohibit lithium battery shipments — verify carrier acceptance before booking
- Large-format battery systems (> 100 kWh) are typically shipped as equipment with batteries installed, which may qualify for different transport classifications than individual cells — confirm with the manufacturer's logistics team
Structural and Thermal Considerations for Solar on Container Homes
Container homes converted for habitation present specific challenges for solar integration beyond the mechanical mounting questions covered above. Two factors — heat management and structural modification — materially affect system design.
Heat: The Container Home's Biggest Energy Challenge
Uninsulated steel shipping containers act as radiant heat absorbers in direct sun — interior temperatures can exceed 60–70°C on a hot day, making air conditioning the dominant electrical load. This directly affects solar system sizing: a poorly insulated container home might require 15–20 kWh/day for cooling alone, overwhelming a roof-mounted solar array.
The most effective intervention is installing a secondary roof structure (a roof deck or pergola) above the container, creating a shaded air gap. This single measure can reduce solar heat gain by 50–70%, directly reducing air conditioning load. Solar panels mounted on this secondary structure simultaneously shade the container roof and generate electricity — a dual-purpose solution that is particularly effective in tropical and subtropical climates.
Insulation quality is equally critical. Spray polyurethane foam (SPF) applied to interior walls and ceiling at 75–100 mm thickness achieves R-values of R-30 to R-40, reducing thermal gain substantially and making the container home's cooling load comparable to a conventional well-insulated dwelling.
Structural Integrity After Roof Penetration
ISO shipping containers derive much of their structural strength from the four corner posts and the top and bottom rails. The roof corrugation panels are not primary structural members — they are relatively thin steel sheets that resist localized loads but are not designed for distributed loads from heavy mounting hardware. Any solar mounting approach that bypasses the top rails and loads only the roof corrugations risks deformation over time, particularly in high-humidity environments where condensation can degrade sealants at penetration points.
Best practice: anchor solar racking rails to the top side rails (the primary longitudinal structural beams) running the full length of the container. These are designed for heavy loads and provide a secure, non-deforming mounting surface that does not rely on roof penetration for structural integrity.
Cost Estimates: Solar Panels on a Shipping Container
Cost varies significantly by location, system type, and whether it is a DIY or professionally installed project. The following estimates represent 2024–2025 market ranges for common configurations.
| System Configuration | Array Size | Battery | Est. Cost (DIY) | Est. Cost (Installed) | Best For |
|---|---|---|---|---|---|
| Basic grid-tied, no battery | 3.2 kW (8 × 400W) | None | $3,000–$5,000 | $6,000–$9,000 | Grid-connected 20-ft container home |
| Off-grid, LiFePO4 battery | 3.2 kW | 20 kWh | $8,000–$13,000 | $14,000–$22,000 | Remote 20-ft container home |
| Off-grid, full family home | 6.4 kW | 30 kWh | $14,000–$20,000 | $24,000–$38,000 | 40-ft container home, full off-grid |
| Containerised solar unit (commercial) | 20–50 kW | 100–200 kWh | N/A (factory build) | $60,000–$180,000 | Remote site, community microgrid |
DIY solar on a container home is feasible for technically capable owners — panel mounting hardware, inverters, and batteries are all available retail. However, electrical wiring, inverter installation, and grid connection must be completed by a licensed electrician in most jurisdictions to meet safety standards and maintain equipment warranties.
Practical Design Checklist for Container Solar Projects
Whether designing a system for a single container home or specifying a containerised solar unit for deployment, the following checklist covers the key decisions in sequence:
- Establish the daily load in kWh — list all appliances, wattages, and hours of use. Add 15–20% margin for inefficiencies and future load growth.
- Determine site solar resource — obtain peak sun hours for the location (use PVGIS, Global Solar Atlas, or NASA POWER data tools) and identify seasonal variation. Design for the worst month if full off-grid autonomy is required.
- Choose container size and roof orientation — orient the container so the long axis runs east-west if possible, allowing the full roof to face equator-ward. Confirm there are no shading sources (trees, structures) that will shadow the roof between 9 AM and 3 PM.
- Select mounting method — flat for mobile or transport-critical containers; tilt-frame for permanent fixed installations; secondary roof structure for hot climates where shading the container is also beneficial.
- Size the array — total daily load ÷ peak sun hours × 1.25 (inefficiency factor) = required array kW. Verify this fits on the available roof area at chosen panel dimensions.
- Size the battery bank — calculate required autonomy days × daily load ÷ usable DoD. Specify LiFePO4 for longevity and thermal tolerance.
- Select inverter and charge controller — size for peak simultaneous load with 20% headroom. Confirm MPPT rating covers full array current at system voltage.
- Plan cable routing — DC cables from panels to charge controller/inverter should be as short as possible to minimize resistive losses; use appropriately rated DC cable (typically 4–6 mm² for individual strings). All roof penetrations for cable entry must be weatherproofed with gland fittings and sealed.
- Confirm applicable standards and permits — check local building code requirements for solar installation, grid connection rules (if applicable), and battery storage safety codes. Most jurisdictions require electrical permits and inspections for systems above 1 kW.
